Showing posts with label DIY. Show all posts

Thursday, August 18, 2016

#sonotladylikegoals2016 - A New Mailbox!

So you might remember from this list that one of my goals this year was to Relocate My Mailbox.  Well, I finally finished this project last month (or perhaps June?), and I am beyond happy with the results!

Let me just say that painting the box was the most fun and easiest part of this project. The rest was an exercise in hilarious failures! The screws I bought were way too long and robust. My drill kept failing on me and I stripped many screws thanks to it. The entire post with box is super top heavy, so it kept falling out of the pot. But I pushed through. and it looks damn fine now if I do say so myself.


Awww, I even painted a thank you note to my mail carrier! I was very excited when my first piece of mail showed up in there.

Supplies Used:
- Wooden mailbox you can find at any craft store. This particular one was purchased for me by my mother after we bought our first home in 2006. It has never been used as a proper mailbox until now!
- Basic acrylic paint and some lacquer for sealing
- Scrap wood
- Metal numbers purchased at Rona. Fun Fact! While rummaging around in my basement storage room last week I found some lovely large metal address numbers for my address! Sigh.

Plants:
- Lavender, crossing my fingers that it will over-winter here
- Marigolds
- Lemon balm that is calmly taking over the whole damn scene and I love it
- Please ignore my sketchy tomatoes in the background. All of my food plants are shit this year.

Monday, December 30, 2013

Wrap It Up

Yes, this is a DIY wrapping paper post. Coming a week after Christmas. But I would argue that it can be used year round. So there.

I wrapped all of my Christmas presents like this. And it was simple, and it's cute, and it's free!


You will need: White packing paper, scissors, washi tape, pencil crayons or markers, regular tape (because the washi tape isn't strong enough to keep these packages sealed!)

Be creative! Put that washi tape in whatever pattern you want! For Nadine & Anna's I used the tape to "write" their initials. Add bows or string or ribbon or pom poms, doodle and paint. If you want to get a little bit more complicated, the sky is the limit with this basic background.

Layer your paper. I found that while the paper I used is very sturdy, it is also very translucent! Double up on the layers to make the entire package much stronger and to discourage peeking!

Get help. This is a great way to get the the little ones involved. Lucas wrote the "to & from" on a couple of boxes, and I think that if he was in the mood I could have had him draw or doodle on them as well.

Personalize them.  Write a fun message or note to the recipient. Who needs a card, when your entire present can serve the purpose?!


And I still have loads of this paper (and loads of washi tape), so I definitely plan on using this system to wrap all my presents next year!

Today is my replacement DIY Sunday with BFF, so I hope to have more fun (and easy...so easy) DIYs for you in the next couple of weeks. Until then...

later loves

Wednesday, December 18, 2013

Old-Timey Hobby

I was saving this post for Bliss-ologie, but with the hiatus happening over there and the fact that I did more last weekend and was reminded of it, I thought I would just put it up here!
photo credits: Lisa & Dan (he got my best side...my sweet ass...)

Lisa Cans!

Yes...yes she does...

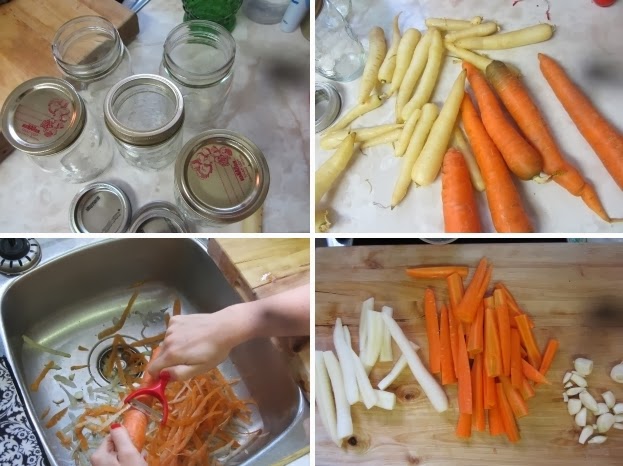
A couple of months ago my Organic Box was offering extra bags of carrots and beans for the canning folk on their list. And I crazily thought I could be one of those folk. So I ordered my extra bags and they sat in my fridge for a couple of extra weeks while I found ingredients, recipes, and time. And then finally I just did it...and here are the photos of the proof. Well, the second round's worth. I had already wet my teeth with super spicy beans before I tackled carrots.


Oh gosh. I am such a dork. A dill moustache? Of course. Of course...


This was my genius moment of the day...too bad it wasn't my genius idea. Instead of buying "canning tongs" just wrap an elastic band around your tongs! Works like a charm!


 It was loads of fun...but not near as much fun as having a helper...


And last weekend, I hauled all of my canning gear - spices, jars, giant pot, carrots, beans, garlic, etc. - to Dan's new place and we pickled some more! And he peeled the carrots! It's a Christmas Miracle!

It took way less time and effort and anxiety with two sets of  hands in the kitchen. Thanks BFF! We did beans and carrots, and used white, orange and purple carrots, which left the brine a bright pink! I am excited to see how they look - and taste - now. I made him swear not to eat any before I got back over there. We shall see if he took the oath seriously. Wink.

And that's that....pickling things is easy. And fricken delicious! Yessiree!!

This is a brilliant idea for a homemade gift idea. I know at least one very special lady who will be getting a couple of jars of these for Christmas gifts. Maybe add a nice tag or ribbon, and you're set to go! Because who doesn't like pickled things? No, I'm serious, who? Because they are obviously crazy and in need of an intervention. Just saying...

Better when done with wonderful company...
later loves

p.s. I googled recipes and found loads and loads. Find the one that suits your ingredients and your fancy. Literally, it's just salt, spices and boiling water. It ain't no rocket science fools. Tis the season...

Wednesday, December 11, 2013

Garland DIY - Say Something!


So I found this website through Elise's blog, and I was intrigued. They have some nice decor and party DIYs. Well, they are really more about giving you an idea then the steps necessary to make that idea come to life. Take this garland for example. The "instructions" start out like so: "simply cut out letters from bright scrapbook paper". Thanks. Duh. Did you trace the letters from something? Draw them freehand? WHAT?! TELL ME HOW!!!

Sigh. Thank goodness I am a fucking crafting genius and can just figure it out on my own. I've made banners before. Loads of them. I got this.

You will need: Scissors, string/yarn/ribbon, cardstock, pen or pencil, tape/glue/stapler (aka something to attach something to something else)

Step One: After choosing your cardstock - you will need something fairly heavy for this - start writing your letters. Mine are about 5-6" tall cause I wanted a fucking huge banner. But make yours whatever size you're comfortable with. Oh, you'll have to have a phrase or word in mind as well. Unless random letters are your thing. "USHLKERZXQ" might look really good on your wall for all I know.

Note: Before we get too far into this, I'm going to go ahead and post a disclaimer that I am really unconcerned with the perfect-ness of this project! If you're real anal-pants you can print off a template from the computer, or use a cutting machine (Silhouette, Sizzix, etc.) to get your letters "just right". Barf, I don't have time for that. Maybe I'll use a ruler, and maybe not. I just want some damn giant letters!

Step Two: Cut out your letters.

Step Three: Maybe have a pee break or get up and walk around or something.

Step Four: Attach your letters to your string/yarn/ribbon. In order. Use whatever you want! Washi tape looks pretty, but a stapler is fast man! I used clear tape on the backs. I was feeling particularly lazy that night.

Step Five: Hang it on your wall or your mantle! Admire with pride! Have a drink...you deserve it!


Cost: $0
I had all this stuff already, and you probably do too!

Time: 1 hour-ish
This project took way less time than I anticipated. Way less. I almost wanted to delete the entire post I had written! Ha! With the damn chilly weather we've been having, I'm not getting to do any of my favourite outdoor winter activities, so I'll just have to make do with some crafting in fits and spurts!

The beauty with a craft like this is in it's simplicity. You got a pencil? Paper? Scissors? You know your alphabet? You got this too!

Best part of the whole project? When I pointed it out to Lucas, he looked super cheery and read it back to me: "Hashtag I Love Winter". My 8-year-old knows what a hashtag is. I can't tell if that's a parental fail, or parental winning.

I think "winning"...wink
later loves

Wednesday, November 27, 2013

DIY Wood Stuff

I have had a tonne of ideas for DIYs lately. A. TONNE! I've got the energy, but finding the time to complete them is becoming more and more difficult. So I thought I would pick a simple one, an afternoon kind of task and just DO IT! And get the ball rolling, so-to-speak.

And so I called in the assistance of BFF...and his mitre box! Who knew cutting a 2x6 down would be so thrilling?!

You will need: saw, wood, sand paper or a mini planer (oh my gosh, that thing was so cute!), paint, paintbrush, sealant (I used gel medium).

Step One: Decide what size you want you blocks. I was using a 2x6 board, and I cut 4 different lengths: 3", 4", 6" and 8". I wasn't a fan of the 6" length, so I didn't cut doubles of it.

Step Two: Measure and cut. It helps if you know a carpenter for this step. It helps even more if you know a carpenter who is willing to measure and mark all your boards for you while you are giggling and dancing around cause you're so damn excited to finally do this DIY. Yep.

Step Three: Cut. I used this fancy Japanese mitre box thingy that BFF has. A table saw, or circular saw, or any kind of hand saw will work fine.

Step Four: Plane or sand any rough edges. I got to use BFF's mini planer, and it was so much fun. My first spiral of wood sent me in to a paroxysm of joy!

Step Five: Paint and decorate! Seal and enjoy! photos to come in Part Two! 'Cause I forgot...

Time: Varies
The cutting didn't take that long because BFF already had everything in his garage, including the wood. I'd say maybe an hour to do 7 blocks. And that's cutting by hand. If you had some sort of electrical saw I bet you could cut your time in half. Ha! A pun! Painting and decorating takes as much time as you let it, depending on the detail you want for your houses and the size of your blocks. The bigger blocks take longer...

Cost: $0 - $10
This project didn't cost me anything extra because I already had everything I needed. But if you were to start from scratch, I know that you can usually pick up scrap wood for a couple of bucks at most local hardware/lumber stores. Craft paint is cheap, and sandpaper is even cheaper! The only thing that costs real money is the saw, so ask around your circle of friends and family and see if you can convince someone to loan your their equipment - and their time to help you - and then you're only out the cost of beer/pizza/friendly payment as your token of appreciation!

The time is there my friends. Make it work for you.
later loves

Tuesday, April 02, 2013

Pinterest in Action

So I almost quit Pinterest awhile back. And you may remember an "editorial" or two (cough*rant*cough) in which I dissed Pinterest to the maximum capabilities of my vocabulary. Well, I have sort of changed my tune. No, that's an incorrect statement. I have changed my attitude and I have started using Pinterest for good. I use it as a place to collect my limited loves on the Internet. Sometimes I catch myself browsing Pinterest for the sake of browsing, and I STOP MYSELF almost IMMEDIATELY! I do NOT want to lose myself in the vast basement full of junk drawer items that is Pinterest.

Although, I have noticed the content has vastly improved compared to the conditions in which I originally left it. So, there's that.

Anyhoo, "what is the post really about Lisa?" is something you might be asking yourself at this point. Far be it for me to get so off topic that I can't get back on. But I have been getting on with putting some of my Pinterest pins into action. SEGUE!


I can handle that!

I used a nail instead of a fancy/nice-looking hook. And I found this wire in my junk drawer of a room studio. The entire project maybe took me two minutes to complete. It's not entirely sturdy...but...


This next one is about equally easy, but more time consuming. i.e. you have to wait for the paint to dry.

They look lovely on my revised mantle....but they were only on there for this photo op! HA! I leave them on my dining room table, which I have managed to keep clean for most of the month as per my March goals. Success breeds success...I mean, the rest of those goals are fading fast, but shut up!

And last but not least...

Did you know that a boombox can change the world?

 HA! I only wish that the canvas was BIGGER, but it's all I had on hand at the time. (And it already cost an arm and a leg, so I can only imagine what the super big ones would set me back. Yeesh!)

Even Dude helped me out with that ampersand. And the K? Inspired by that little Polyvore set I posted the other day!

Now if only I could figure out how and where to hang them...geeze Lisa. That's just wrong.

I am very super proud of myself for actually accomplishing some of my Pins! I have felt very inspired to DO STUFF lately. I thank the change of season and that extra hour of usable sunshine we've been getting! I also made a skirt, from a pattern! And fancied-up a black cloth grocery bag. I'll post those here as well, since I need a little public pat-on-the-back every now and again.

If you are at ALL interested in following me on Pinterest (if you are so inclined), you can find me here. I'm trying not to be a completely obnoxious "over-pinner", but the jury's still out on that one! And as for my Instagram friends who have already discovered the Insta-Spammer that I am...I apologize.

later loves

p.s. I hope I didn't turn you off from following me on Instagram now! HA! I am a "private user", but that's because the trolls creep me out. I would love to be friends with people who are actually known to me!

Wednesday, October 03, 2012

Best Friend Favour

I have this wall in my dining room that has been bugging me, design-wise, since we moved in. There have been many different storage and display "solutions" to grace this space. Dark burgundy bookshelves, a white pantry, one lonely LACK shelf. And some days it was just covered in pictures and paintings so I wouldn't have to really deal with it.

Ultimately, I was worried that whatever I put up there, no matter how permanent or temporary, I would end up hating it sooner or later. Cause that's how I roll! My "design sensibilities" are ever-changing. I knew I would need something super simple and easy to install, cheap, and easy to move (when we move) or just leave behind.


I have been seeing these simple (simple) bracket shelves in magazines and on the Internet lately. And I had a flash of inspiration, and confidence! This was it!! It fit the bill, and was just industrial enough and bare bones enough to work and (maybe, potentially) not make me hate it in a month! And I could put all my books on it. All of them. And I love books as decor. Much more than decor as decor.

And now for the installation............which was obviously going to require some sort of skill. i.e. more skill than I have when it comes to hanging things! Also, a second pair of hands might be helpful.

And so I asked BFF for a favour.

This was a big deal for me. I don't ask for favours. I don't ask for anything. I like to keep to myself, and just figure it out and muddle through...yeah...there are other issues there that I won't get into today. All that you need to know is that he said yes! And we made a shelf-install date.

Did I mention he's a carpenter?

I got to use his fancy (professional, expensive) drill. And I didn't swear or make any extra holes in the wall then necessary...well...maybe a couple. Ha! And it didn't even take that long. And he had a much better solution for the actual shelves part than I had! And I was so happy after he left, I just sat and stared at my lovely, straight, solid & sturdy brackets. Sigh...a thing of beauty is a joy forever.

Did I mention he's awesome?

So I spent the rest of that Saturday (many Saturdays ago) driving around town looking for 1x8x10 boards that I could paint. Thanks to the lovely young gentleman at Totem who helped me out, then proceeded to cut each board by hand down to my specified 9 feet. And then carried the boards to the cashier, and then just kept carrying them out the door to the truck! Sigh....sometimes it doesn't hurt to be a cute girl!

And then I got to some painting....with help from the Dude! He was so cute, and messy. Hey BFF, I guess I found me a stud after all!

paintingpainting
(wow this is turning in to a long post...)

And then many weeks went by...or maybe just two. And the shelves sat in Mom's garage waiting for the perfect moment to come home. Re: I needed someone with a saw to come to my house and cut them all to fit cause I just knew they would be too long.


Thank goodness I have other handymen in my life...Heath. The day before my birthday Mom & her sweet sweet husband came over with the saw. Russ measured and marked, Heath cut, and my shelves made their way in to place.

And then I immediately started filling them up with my books!

This whole project was definitely a group effort but so very worth it.
(here it is a week later, still a mess work in progress, but I still love them!)

later loves

p.s. I seemed to have conquered a little bit of the anxiety and panic that comes with having people in my house, even if it was "only" BFF. But that's a whole other post!

Tuesday, September 04, 2012

Are there Dudes here?

Have I ever told you about the Man Made DIY site? It's full of handy info, cool design stuff, entertaining, fashion, and the like but geared towards people of the gentleman variety.
post source

I have found some awesome and practical tutorials on there (how to punch a hole in a leather belt, for example).
post source

He also shares some interesting cooking/baking/entertaining recipes. I would love to try my hand at making this 3D Death Star Cake, and anything made with beer is a-okay in my books! Oh, and his classic cocktail recipes are going to be in rotation at my next party, whenever I'm brave enough to make that happen. And can find some "Angostura bitters"......oh who am I kidding......BFF.....??


And since this is a site for men (not ladies like me), he posts cute manly awesome how-tos like this one: How To Dress for a Date Like You Know What You're Doing. I know (first hand) the dorky-lady version of this, but it's interesting to see the smart-dude take on it.

Pretty much the whole site reminds me of BFF. He's a walking-talking "Man Made DIY". Common phrases uttered are: "I'm thinking of building my own old-timey radio", "I bought this print online, I just have to make a frame for it with some of the scrap wood I keep in my garage for just such an occasion", and my all-time favourite, "They have that at Lee Valley". Oh BFF...I love you!

later loves

p.s. if there are actually real live DUDES that read my blog, you need to post a comment! What an achievement!

Wednesday, August 15, 2012

Tee Re-Fashion SUCCESS!

This afternoon I thought I would share a little "re-fashioning" I did of this most rad-tacular tee I bought in one of my latest Thrift Shopping Success Stories. I mean, how could I say no to this one!? It's soft (oh so soft). It's the perfect shade of grey. And it has faces all over it. But it's not the most flattering fit for me: sleeves too long, neck too tight.
So I got it in my head that I could make it look more like my current favourite tees from Joe. These boat-neck fellas are receiving some mad rotation in my wardrobe right now.


 Starting off, I had to cut down the arms. I used the Joe tee as a guide for the angle I wanted.

To get about the same cut on the other arm, I used the discards of the first cut as a guide.

The neck was simple as well. I cut into the main seam at the top, a couple of inches. Then started rolling the fabric down. If there was extra bulk, I snipped off a piece of the fabric that wouldn't be showing. I did this on the front and the back. Then I pinned it all down. Same with the arms.
And then I stitched. With black thread. So you can totally see the thread, but I'm not too worried.

Cause I think it was a total success!
I look pretty epic if I do say so myself. And this mini sewing project has giving me some confidence to start on my skirt-from-scratch project that I want to try. Heck, I even went out and bought a fancy zipper for said as-of-yet-imaginary skirt. Maybe I'll wear it with this tee for double confidence!

Or maybe not...it will be a bit "clashing"...

CHALLENGE ACCEPTED!

later loves

p.s. check back tomorrow to see how I styled this shirt for a Fashion Un-Able Errand Run!

Monday, August 13, 2012

Monkeys Like Friendship Bracelets

In continuing with my "even a monkey could do this" DIY, y'know, feature or whatever. I was reminded about my lurve of friendship bracelets recently when I stumbled across a blog post. And as per the usual internet shenanigans, I can't find that post anymore. But I did do a Google search for "friendship bracelets" and found the results plentiful.

With tutorials.

And pictures...

And I really needed a creative task to do, without it taking up too much time & space on the time-space continuum. So...me and my monkey are going to hook you up with a sweet friendship bracelet post!

And I might - in the future like - use this as a dexterity improvement task for Dude as well...TWO BIRDS!
Making this bracelet - using the "granny colours" of floss I picked up from VV ages and a half ago - took WAY LONGER than anticipated. I was quite the conversation starter at work. Which is unfortunate, because I hate talking in the lunch room...yeah...
 But very worth it when finished. I have secured it to my wrist with the ever-fashionable safety pin which is thankfully not pictured in that picture! How embarrassing. wink.

But this was the prototype. The "kink working out-er". And perhaps I have worked out those kinks. And perhaps I have more of these, and in better colours, in my future.

And perhaps one of these is headed out even as I type this to a certain pen pal, in a certain mountain tourist town...'m just sayin'...

later loves

p.s. Like my sketch book/journal/list container? I haven't been arting lots lately, but I do carry this little moleskin around with me, filling it with lists and thoughts and doodles. Very satisfying.

Wednesday, August 08, 2012

Stamp Makin

I think it was Ginger that commented on a stamp I made, writing that she would just love to learn how to make one of those for herself!

Well, here is a "Even a Monkey Could Do It" DIY post in the traditional style of Lisa. Welcome all you TM Lurkers! Boy, are you in for a treat! HA!

So to recap, sort of, the TM post that lead to this post. I showed everybody there the simple (read: "Lisa-Monkey") way to make your own stencil. But I thought it would be fun to take that a step further and make a stamp that could be used in conjunction with your stencil!

You will need:
- The stencil you made. Check out this post for some tips on that.
- A skinny Sharpie (mine was too fat...story of my life ;-)
- "Make Your Own Stamp" rubber & stamp carving knife. I bought a basic starter Speedball kit from Michaels.

Step One: Trace your stencil on to the rubber piece. And this is where my "testing things out first" comes in handy for you. Don't forget that when you eventually use this stamp, it will be backwards from how you are drawing it! So flip your stencil over and trace the wrong side! I did it wrong...yeah...

Step Two: Mark the areas that you are going to carve, just so you don't forget and get confused and carve the wrong area! Remember that you want the reverse of the stencil. So you want to carve the part on your stamp where the ink will show on the stencil.
It will make sense in a minute, I promise!

Step Three: Carve it out! This part takes a little bit of practice to get straight lines and everything. But I promise it is worth it. Go slow. Take your time. Follow the lines!
Once have carved out the innards, you can cut out the entire shape from your big block. I use craft scissors for this, then trim the edges with my carving tool.

And now you can stamp stamp stamp away! And turn this...

Into this!
Oh man...I am not going to get tired of this little set any time soon!

And here is that finished layout (again).

If any of you take any of these tips to heart I would LOVE to see the fruits of your labour! Link me up!!

Well...that was fun. Now I am off to bed!

later loves

(p.s. it's 10pm where I am. Y'know...in the past)

Thursday, July 26, 2012

I'M BACK!!

Hide your kids, hide your wives, hide your husbands... And it's about darn time. It's too bad that Russ had to work late last night, but it gave me an opportunity to finally get on the laptop and get some blogging done!

First things first, let's get caught up on my official TM Blogging job............okay done! That was tough. I almost forgot what I had to do. Oh dear...don't tell the Boss!

Now, on to bigger and better things. Like an "Even A Monkey Can Do It" DIY. Yep yep yep.

And this week my DIY involves some ink and a tank top with a stain on it. Ooooohhhh.....aaaahhhhh. Excitement abounds!

This story has many beginnings. Also, it's not really a story, per se, but a series of events that when randomly shoved together give this DIY a nice back story.

Okay, so Russ cleaned the grill part of the BBQ one day. This was right after we got the new-to-us one from his brother, and it was gross. He left the grills in the sink, and I washed something in said sink and got a lovely, greasy smear on my new (and quite flattering) tank top. Insert sad face here.

Thankfully I was lucky enough to find another at Superstore before they disappeared forever (they were a popular style this summer, oh my!). It's the most perfect light pink, racer back, light, flowy but not too flowy, tank top. It was flattering, hell it made me look better than normal! I just couldn't lose this one. Ladies...you know what I'm talking about.

But I hate to "waste clothes" so I have been wearing the stained one to the gym. With my fluorescent orange sports bra. Yep, I'm classy like that.

Here is where the perfect DIY potential comes in. A shirt I don't really care about any more, looks-wise, some colour wash, and a bored blogger.

Step One: Lay your shirt on a nice flat surface, and stick some paper or something inside. This is so the ink doesn't bleed through to the back.

Step Two: Grab a paintbrush and some liquid fabric dye. DID YOU KNOW that Ranger/Adirondack/Tim Holtz Colour Wash is actually a fabric dye? Say what!?!? I haven't quite worked out all of the kinks (I'll explain that at the end) but I have dyed pieces of fabric for headbands quite successfully in the past!

And paint right on your shirt!

You'll notice I have some wonky letters. The ones on the left were with very little ink. And the ones on the right were with lots of ink and some water thrown in for good measure. Good thing this was just the guinea pig...

You'll need to heat set it to dry. Let it air dry, then stick it in the dryer. I didn't let it fully set before wearing it, and sweating in it, so I had a little runoff on to my hands. I'll give you an update the next time I put it on, and wash it, for colour-fastness. I'm not too worried about the text running. It's already done a little of that on its own.
You know those shirts that read "I LOVE PINK"...I hate them. I hate wearing brands, especially ones that scream in your face! This is my retaliation.


Man...that tank is just so flattering! And please ignore my scary bike shorts. I haven't worn them outside of the house yet, as I am just not quite used to them. But they are comfy and seem perfect for my standard inappropriate gym attire.

I did up a sweet "tie-dye" tank as well, using another of the same style, this time in blues and greens. We'll see if that makes it's way into a fashion post in the near future...hmmm....

And with that, I am off to yell at Typepad and set up a post here for tomorrow as well! Gasp! Egads!

later loves