

I hope everyone "enjoyed" the last (and first...hmmm) Blogger FYI Post last week. I covered how to rotate your photos, and I actually got a related email the next day and directed her to the post! Go figure!
This week I'm covering some basic html, including how to add a link within text.
Last week, Shiloh asked me the following:

And here is the answer...log on to your blog, and start up a new post.
Step One: Find the website you want to link. Open up a new window or tab and get to the website, blog, whatever. Did you know that if you click on the title of a specific blog post, you can get the http for that particular post, instead of just referencing the entire blog! Yay! Select the entire address as it appears in the address bar, and COPY it. (Ctrl+C or right click and select Copy from the drop down menu that appears).
Step Two: Type the text you want the link to be connected to. Example: "here". It doesn't need to have the quotes around it!
Step Three: Select the word. There are a couple of ways to do this. Use your mouse. Easy. Keyboard method is to place your cursor at the start (or end) of the word, and hold the Shift key while clicking over with your arrow keys until the entire word is selected.

Step Four: Click on the button at the top of the post screen that looks like this: Link. See...it's right beside the little photo icon.

Step Five: Now you can paste the website address into where it says: to what URL should this link go?
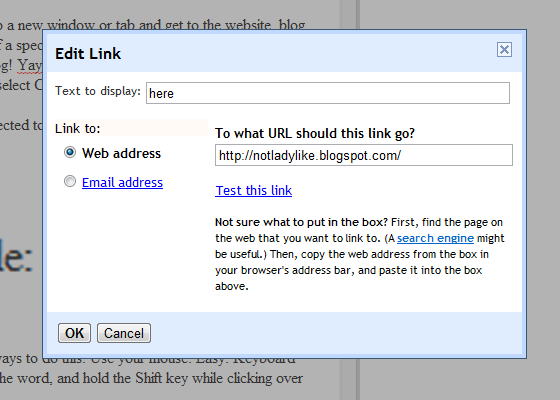
At this point, you can change the text display for the link if you want.
You could also add your email address, if you want to add that kind of capability to a blog post. If you're unsure that you got the correct link, select Test this link and it will open up a new window using the link provided. Click OK once you've got everything in.
And now you're done!
Notes about linking:
- Don't grab the website code of an actual photo!! Every time the picture loads on your blog, you are using that original site's bandwidth (or whatever technical mumbo jumbo you want to call it) and it is in bad form. Also, it doesn't show the context of the original photo, which can also make it hard for readers to explore the rest of the site, which is half the point of referencing external material.
- Remember to reference the source for a photo you posted but didn't actually take yourself. This is just good blogger etiquette, and common sense. If you are using a site like Tumblr, you can't link the original owner of the photo (not good), but sites like Pinterest or Flickr show the original artist/source and can be referenced quite easily.
*****
Basic html stuff...
At this point I'm just going to cover a tiny smidgen of html that might be helpful to you in the future, and with future Blogger FYI posts.
Before the new Blogger editor, it was more difficult to add a hyper link to text. So I would just do it the "old-fashioned" long-hand way, which is what I'm going to show you today! This is still useful if you want to add a link to a comment, but don't want to show the whole darn link! Same goes with emails (using html editor, not rich text).
The entire lesson is based around a couple of symbols and a couple of letters. Don't ask me what any of them mean, or the techno-jargon around them...I don't know and I don't care! I know enough to get by, and so far that's enough.
Here is the code you can yoink if you want to reference a link in a word. Just replace the italicized info with your own.
<a href="http://notladylike.blogspot.com/">FormerlyLisaS</a>
Please remember to get your < and the > in there, or your code won't work. You need one at the start and one at the end of every section of the code.
a href just tells the computer brain to watch for a web address coming up. Make sure you've got your equals (=) sign in there and put the web address in quotation marks.
</a> is telling the computer brain that the code is done, that where "a" began, so "a" is finished.
Like I mentioned before, this is great to use if you are including a link in a blog comment...

This is the preview of the Comment...you can do that y'know!

*****
A final note...
If you click the Edit HTML tab at the top of your post, you'll get to see all the behind the scenes stuff, all the html that is required of your blog post for the computer brain to read it properly. Every time you change a font, or hit enter, or add a link, another code is entered. Don't worry about most of these. FYI, this post looks hilarious in the HTML tab! If you really want to send your brain in a downward spiral from whence it will never return, check out the html for your entire blog!
Anywhoo...that's your html lesson for today. I hope it made some semblance of sense. If not, please leave me a comment or an email with your specific issue, and I'll try my best to help you resolve it. The Williams Sisters have already had some success with the photo-related Blogger FYI, so I am hopeful for the future!

No comments:
Post a Comment
While I don't individually reply to each comment, I want to say "Thanks for commenting!" If you have a specific question about a post, please send me an email!