Good Afternoon Readers!
First, some basic housekeeping. I am giving tips on using Blogger. I have no idea how to fix mostly anything on Typepad, or Wordpress or Live Journal, or any of the other blogging platforms out there. Also, I use Google Chrome for browsing, but all of these tips should work in all browsers. If the directions are a little different from browser to browser, I'll include it in my write ups.
I thought I would start Blogger FYI with a fairly regular problem I used to have. I would load my photos, and they would be rotated the wrong way. Don't ask me why this happens, and only on some photos...I still have no idea. But I do know how you can rotate those photos so they are the correct orientation, before you post them!
Step One: Upload that photo. You should be able to see in the preview screen that it is the wrong orientation. That's okay.
Step Two: Type in to your browser the following address: picasaweb.google.com. Open a new window or new tab to do this. Don't log out of Blogger before doing this because you're just going to have log in again!
You should see a page like this, with the name of your blog and a photo. I have lots of blogs, so I have lots of albums. When you open a Blogger account, a Picasa Web album is created for you. This is where all your photos are stored once you upload them to your blog. If you delete a photo here, it will disappear from your blog.
Step Three: Click on the album that is associated with your blog. Now you should be able to scroll down through all the photos and find the one you just uploaded that was the wrong orientation. Click on it.
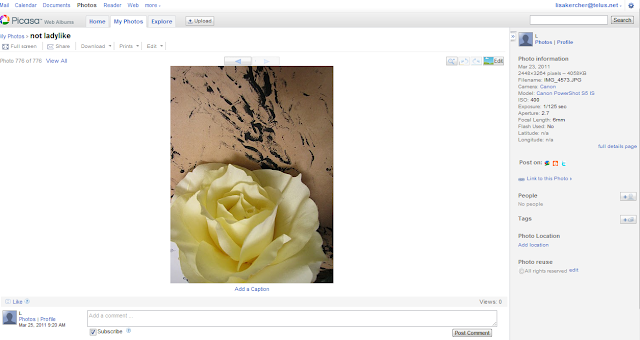
Step Four: The screen that opens up should look like this. There will be all the info about the image on the right sidebar. Find the button marked Edit and press it (see photo below for a close up)
This little goofy screen will open and tell you that they're getting the picnic ready for you. This isn't important, but it is cute!
Step Five: You will see the screen below. Your crooked photo in all its glory. You want to click on the "Rotate" button up in the top left.
See...there it is...And you can choose which way to flip it. Just click on the correct button there.Step Six: Once you have rotated it, click "Save" (it's on the right side of that menu bar). It will ask you if you want to save a new copy or replace the old one. Just replace the old one.
Step Seven: Now, go back to your blog. Remember you left the other window/tab open with it still running? Click on Upload Photo (which is the cute picture of a picture at the top of the post) and in the little window it opens up, click on "From Picasa Web Albums". That's the screen below. Then select the proper album.
And the correct photo. It will be at the very bottom, so scroll scroll scroll all the way down. Select it even if it still looks crooked. If you saved the corrected version in Picasa it will load correctly.
Now you can make it a nice big size that fits all the way across your posting space. If you've got the room, why not use it. I have a really large posting space, so I can choose X-Large and it works out okay.
Try large and x-large, and preview the post so you can see how it looks. Select the image by clicking on it, and the handy little toolbar will appear below. You can change it from left to centre orientation, or however you like it, add a caption, or delete it ("Remove"). This is how it will look in your post before you post it.
And voila...this concludes our first Blogger FYI installment: Rotating Photos.
A final note about photos on Blogger. Once you upload a photo once, it will always be accessible to add to your blog again. Meaning, you don't have to upload it again if you want to use it again. When you click on the "Upload Photo" icon, choose "From this blog" and find the photo you want to use. This will come in handy if you have a signature, or Feature image, or something you want to use a lot.
If you have any specific questions on rotating photos, or are unsure of something I mentioned here, or are having problems that aren't mentioned here, please email me. I am very nice and will be happy to respond!
Until next week...when I will be covering hyper links and some basic html...


No comments:
Post a Comment
While I don't individually reply to each comment, I want to say "Thanks for commenting!" If you have a specific question about a post, please send me an email!