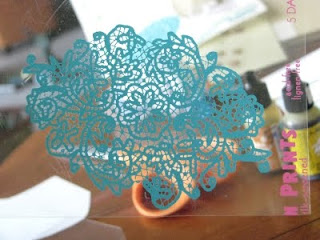
Hi Peeps! I have been diligently working on this Friday DIY...heck I started it last week...and finished the layout earlier this afternoon. And then I realized that I had forgotten to work on my Trends and Technique post for today! HA!
I have this lovely mess on my floor, transplanted there from various other corners of my house, and not much to show for it!
This week's DIY is very reminiscent of my Techniques over on the other blog, but I thought I would share it here instead...it will probably make it's way over there as well! Especially now that I have left myself in a bit of a pickle!
So thar she blows!
You will need:
- rub ons
- alcohol ink
- blender tool and felt pads
- transparency
Step One: Cut out the rub on you want to use.
Step Two: Rub it on to the transparency. I like to use the remnants of Hambly sheets, instead of buying new ones.
Now you have a nice rub on, on a clear background.
Step Three: Cut out your rub on. It doesn't have to be exact, but make sure it looks clean because the edge will really stand out once you colour it.
Step Four: Now flip the rub on over so it's facing down, and pull out your alcohol ink and applicator.
Step Five: Apply some alcohol ink to the felt pad on your ink applicator.
Step Six: Apply the ink to the back to the transparency.
Smudge it around until the entire shape is covered.
I really like how the orange-yellow alcohol ink looks against the bright teal of the rub on! Eek!
Let it dry...it should only take a second or two. Then position it on your layout. You can glue it down with pretty much anything, except for a white paper adhesive...then you will see the adhesive show through the transparency.
And then build your layout! You could make a whole bunch of these to place around your layout. Or layer them to make a fun 3D flower.
Here is my finished layout:
*****
I bought a couple of sheets of the new Hambly paper and a transparency yesterday. It's not as amazing as I have come to expect from them. And no new rub-ons. And the stickers were back-ordered. That's fine...I'm out of craft money this month anyway...already...
I did manage to finish another layout last night during the storm...
I think I will post this one on the TNT blog as well...I used the test sheet from the spray ink demo I did last week! I love using leftovers and remnants as backgrounds! The background of the layout in the DIY was leftover from one of the TM show and tell. I yoinked a bunch of the misprints from the store to use...okay, I yoinked them all! They kind of have my name written all over them!
Funny thing about this layout: I planned it all out before printing the pictures and I was sure the photos were vertical. But alas, they are not! So I just flipped them and glued it all down. What do I care which way the photos sit on the layout...as long as they are there, and so is the story.
*****
I worked out this morning. i feel really great.
*****
any more takers for the SUPPLIES SWAP? I wrote that giant and bold for all the skimmers out there so that even they might take notice and read these few lines. I only had Veronica and Electra reply in the positive at my last request.
This isn't going to be a big deal. Very low commitment, but with a deadline, and we're all scrappers here so it shouldn't be hard to find some extras in your stash that you don't use anymore. A couple of things, a handful really. And trust the mail lady, it doesn't cost much to send a little package in the mail...
So leave a comment, or drop me an email if you want to participate. I'll give it another week, and if I have no more takers the three of us will swap with each other and call it a success.
that's all she wrote.


No comments:
Post a Comment
While I don't individually reply to each comment, I want to say "Thanks for commenting!" If you have a specific question about a post, please send me an email!